CanalNetworkDocs
Creating and Managing Design Criteria
Establishing a set of design criteria is the basis of design work. These data are also the key input data for tackling the sizing and detailing of a network of canal system in CanalNETWORK. See Standard workflow in Introduction to see at which stage of project design this may be required. However, it is highly recommended to set a design criteria set as the first step in creating a project workspace.
Note: Design criteria can be edited at any stage of the design process. However, your changes may not have any impact until you have re-applied it by invoking other processes. Most variables are applied to the actual route data base during the network sizing stage, and reapplying newly modified design criteria requires invoking this task, risking the loss of all design works you have completed earlier. It is therefore, a strongly recommended practice to set the data set at the beginning and to try and maintain it thorough the project design process.
CanalNETWORK environment in the software offers tools to set and edit key criteria for design work, corresponding to each generation of canals.
There are options for creating design criteria set for a given project. These are:
-
Default Criteria set, found in software library.
-
Pre-created criteria file stored in .dcf file …
Default criteria set
This method very common among users. It brings forward the builtin default criteria set depending on the naming style of choice. Once the default criteria is loaded, one can always edit the contents to suit project conditions. To use the default criteria set:
-
Start an empty project, from
Workspace > Clear Workspacethen selectingAllfor the confirmation dialog.Go to
Workspace > Manage Design Criteria... > New Naming...to select a desired naming style for your network of canals.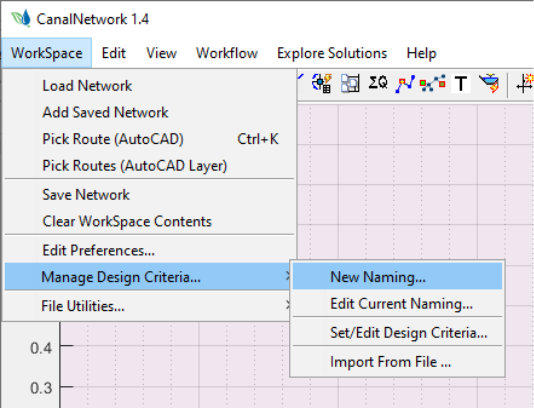
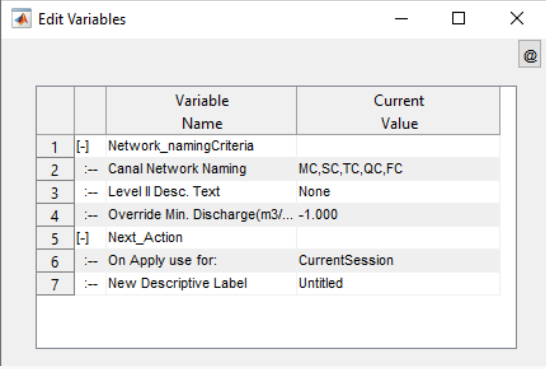
-
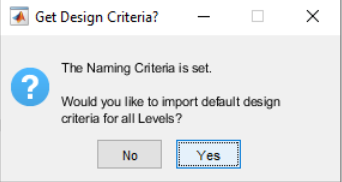
Click Yes on the Get Design Criteria dialog. This will copy the built-in default design criteria to the workspace.
-
To Edit the criteria for each route to suit project conditions, go to
Workspace > Manage Design Criteria > Set/Edit Design Criteria... -
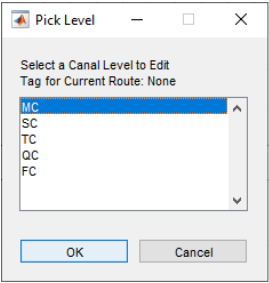
In the Pick Level dialog, choose the desired canal level or generation to edit.
-
Edit the parameters to your requirement and ckick on
Applyto save changes to the workspace.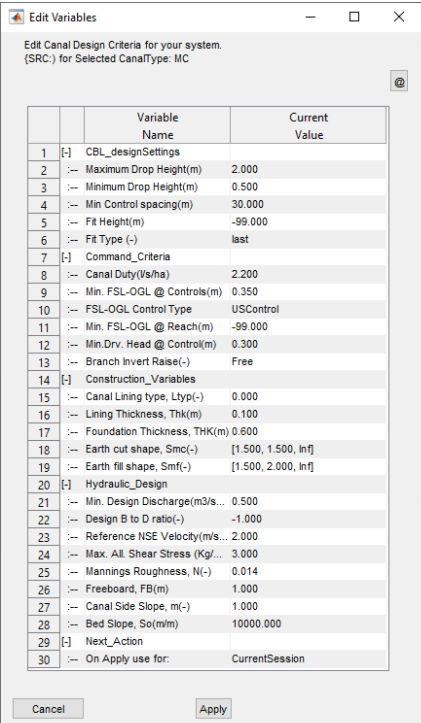
In recent release new variable sets are included to allow flexibility in the design of complex cut and fill shapes. See the section About Design Criteria for details.
-
Repeat the same for each generation of canal route.
Saving Design Criteria to a File
Saving design criteria to a file can be very helpful, especially when working in collaboration with other members of a team. In such collaborative working arrangements it is crucial that important data such as design criteria remain consistent, and do not change from engineer to engineer, thereby ensuring that each and every aspect of the design is completed with the same design criteria. This feature is one of the many ways the software can ensure quality of design processes.
To create a naming preference and design criteria for saving to a file, and later use by a project:
-
Create and refine the design criteria set required following the steps above for Default Criteria Set
-
Go to
Workspace > Manage Design Criteria... > Edit Current Naming.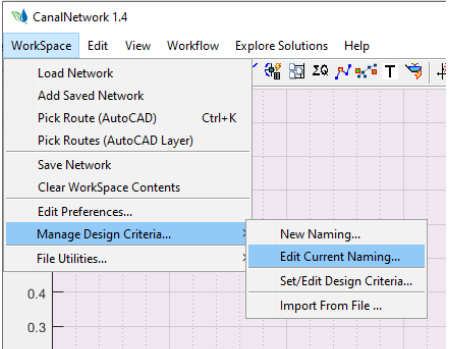
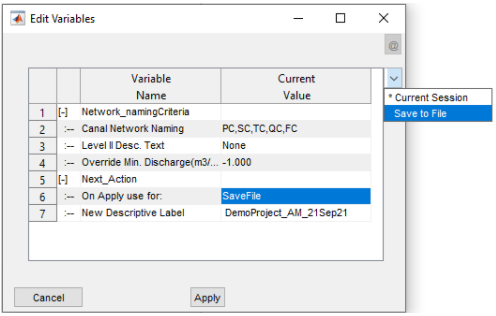
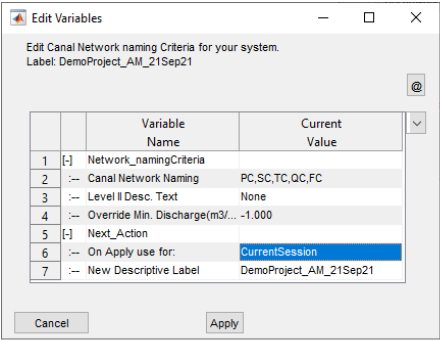
Provide details for the Next Action variable group as shown below:
-
In the On Apply use for variable, select Save to File option.
-
In the New Descriptive Label insert a detail describing the criteria set. It is ideal to use the project title with creation date, version and intials of the creator as applies.
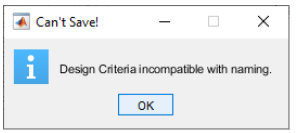
Beware of the Can’t Save! Dialog. This happens, if you have changed the naming style after defining a design criteria, and they are incompatible. If this happens, clear your workspace and start all over again.
-
-
Hit Apply. The file dialog Select File to Write will appear. Provide a descriptive file name and hit Save. By default a .dcf file extension applies to all design criteria files created in this manner.
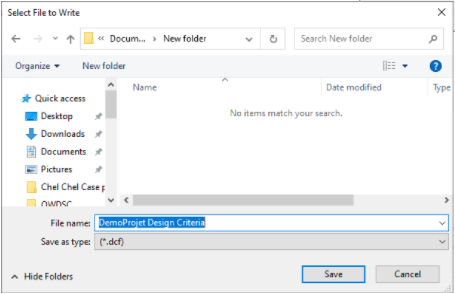
At this point, the naming style and design criteria set are saved as a file. This file can be used for importing design criteria to a new project, as in the second method above. This file can also be shared to a group for use in deigning components of a project in parallel, or saved for later use to fast-track project set up in future.
Import from a Pre-created Criteria File
This method allows users to import criteria from an existing file. For this method to work a .dcf file, successfully created using the same process as above and existing on your storage drive, is required. To use such file as a design criteria source for your desired project:
-
Start CanalNETWORK or clear the workspace of an existing CanalNETWORK session from
Workspace > Clear Workspacethen slecting All from confirmation dialog. -
Click on
Workspace > Manage Design Criteria… > Import From File…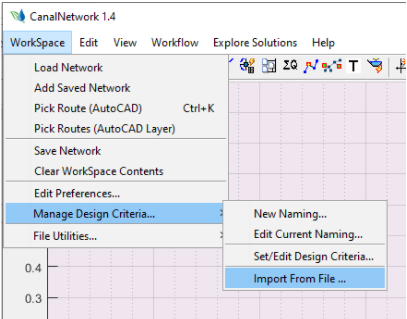
In the Select File to Open dialog, choose your file and hit Open.
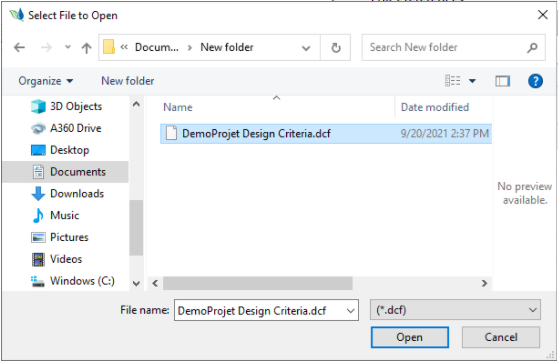
If successful, the Success dialog will display status and summary of the contents of the data file.
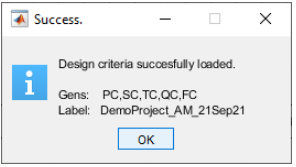
The saved design criteria, along with the naming style used to create it is now available in the workspace. Check using Workspace > Edit Current Naming... The editor dialog displays the contents of the data file, with a note at the top, proving the description level for the data file that was entered during the time of creation.
Overriding Design Criteria
Latter in the longitudinal profile design stage, the user may want to change some design criteria values to suit specific conditions on a specific route. This option is available to automate manual override procedures that may take time. Refer to Longitudinal Design of Routes guide for more details.
Replacing a design criteria from file
For a route with complete design information, you can replace the design criteria from a stored data in a .dcf file. Simply follow the above described procedure and go to Workspace > Manage Design Criteria > Import from File.... Pick the file containing the criteria data.
If found, a dialog displays the criteria data set for available canal leveles. You can decide to select all, or pick just a few, and continue. The process will replace criteria data set for the selected canal level(s) from the file to the corresponding canal level in the workspace.
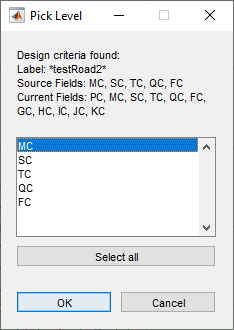
Note: This makes the data available to the workspace. If you were to resize canals, the new data set is used. To apply such newly imported data to already designed canals, Select the canal route in plan view, the use Ctrl+E to start Variable Editor with the design criteria list. For On Apply use For variable At the end of the list choose ** Apply to Current route**. Then hit apply.
Important Note
The design criteria and naming style are critically linked. It is mandatory to maintain the consistency of the data in both. To be specific:
The design criteria data set has exactly the same fields and labels as the naming style. FOr instance, a naming style MC, SC, TC, QC produces a design criteria data set with exactly four fields, each labeled MC, SC, TC, and QC.
Normally, this consistency is maintained through out the life of the data file with out the requiring any action from the user. However, some actions may lead to possible incosisteny, and cause issues - such as inability to save criteria data to a file, resulting in early termination with a message similar to ‘… data inconsistency’.
The most frequent source of data inconsistency between naming and design crietia is the users DELIBERATE action to change the naming style after a design criteria is established. This is ALWAYS a problem, and must be avoided. As explained above in Design Criteria Set, the namin style definition ALWAYS preceeds the Design Criteria definition.
Inconsistency may also arise if the use opts to import a design criteria to a project for which an other set of criteria is already defined, and used to establish the canal network system. This is especially true, if the naming style in the import file is not exactly the same as the one in the project.
As a final note, it is ALWAYS recommended - and a best practice - to carefully choose and set a naming style that could best represent the project in question, and maintain it that way.
Attempting to Solve Criteria Inconsistency
If such issues arrise, there are a few ways the user can attempt to resolve the issue. However, success is not guaranteed.
Change the Naming Style
The easiest way is to change the naming style for the current project to match exactly the fields for the design criteria. The later can be seen from Workspace > Manage Design Criteria > Set/ Edit Design Criteria... This will list all the available fields for the data. Make note of it.
Then change naming style. There are two ways to do this:
-
go to
Workspace > Manage Design Criteria > Edit Current Naming...and Choose the one that matches the above noted list. and hit Apply. -
go to Workspace > Manage Design Criteria > New Naming… This will throw a warning message. Choose a desired naming that matches the above noted list, and hit Apply.
This should solve the insocistency. The crietia set can now be saved. Go to Workspace > Manage Design Criteria> Edit Current Naming … Then in the dialog, set the value for On Apply use for variable to Save to File, and hit Apply. This will allow to save data to a file in a prefered location.
To use the above saved criteria set, in any open project go to Workspace > Manage Design Criteria > Import from File... and pick the file saved above. This will import and replace the criteria set in the project, if any, with the new one.
END.